FINALLY!!! after talking about this forever I've gotten all the appropriate licenses and thought it's time to start posting things for sale on Etsy.com. http://www.etsy.com/shop/katrinaandcharlie?ref=pr_shop
To start I'm posting functional items, they don't rank high on the cute and creative scale but I still think they're highly valuable... if you've ever had pain you'll understand why!
I'm able to purchase professional medical grade hot/cold packs through my chiropractor, did I mention how amazing she is??? anyway, I LOVE, LOVE, LOVE these large 10X15" ice packs that can be used hot as well. One morning I put my icepack on bare skin and decided I had had enough and needed a cute fabric cover. I went down stairs and grabbed one of my favorite picnic damask fabrics and made a cover. Since that first cover I've made many which others have benefitted from. I discovered that one of my favorite fabrics for these comfort covers is flannel!
For years I've tried finding just the right thickness of towel, trying various kitchen towels to cover my ice with to protect my skin. The problem has been that when I find the right towel the ice slips right out. So... I made my own cover and now I have them to sell. I'm happy to take orders if you have ice packs that are different sizes that you'd like a cover for. Just let me know.

Saturday, April 23, 2011
Monday, February 7, 2011
the winter coat I've still not added buttons to
 I've been meaning to post pictures of this jacket for a long time and still have not put buttons on it, which really means that I spent enough time making the jacket that I wanted to find my sewing machine manual to practice using the button hole feature before I tried to wing it on my own. So it's still not happened and now the once deeper purple fabric with blue polka dots has faded to a lighter shade but only because it's been loved.
 For this jacket I used a pattern, project runway inspired in fact. The pattern is for a larger coat and longer also. I took out the pattern and looking at the difference between the sizes estimated where a size 2 would be and I drew it on the pattern. Then I traced the pattern on to another piece of paper and cut it out so I could place the pieces to waste the least amount of fabric. I bought this fabric from Piedmont Fabrics (which is about 50 miles away) and originally I grabbed it at the last minute thinking it would make a cute pair of pants. The fuchsia mohair wool I got was supposed to be this years coat but now I'm thinking maybe next when she's not drooling. I managed to squeeze this out of 1 yard of fabric which is a heavier weight made in Japan, almost a decorator weight fabric, definitely not quilting fabric which is what most fabric stores seem to carry.
  To give warmth I used a layer of flannel and based on a suggestion by one of my talented girlfriends I steamed the collar around the neck of my dress form with a towel underneath and left it to set overnight before assembling the jacket together.
If I had to do it over again I would have put buttons on, obviously I still can, but seriously I might have left the length a little bit longer, even just a few inches. I cut the pattern shorter than it was which is great for a moving girl.
In these picture I've made the rest of what she is wearing except for the knit top which you can barely see underneath. The pants are made from the same line of fabric as the jacket and the days she wears them together it feels like an explosion of polka dots, but I think it's okay.


The damask top is one I made last year, I LOVE, LOVE the fabric and think I could cover everything with it and be perfectly happy!!! yes, fabric makes me happy and so does sewing.
Sunday, February 6, 2011
une poire

I tried to choose a variety of fabrics and initially started out cutting out several of each print only to realize not many are needed to complete an arrangement.

Wednesday, January 26, 2011
Piedmont Fabrics
 It's time for spring! Mom came to town and this trip before my gallbladder surgery was one of the highlights of our time together, for me at least. I discovered this quaint fabric store a few months ago and found many of the pieces I've used to make Gabby's clothes out of, including her jacket and jumpers made from bright bold fabrics (more like home fabric weight or bottom weight cottons), like the one below which I paired with light chambray gap jeans for the day.
Oh, and did I mention all the fun fabric we found? will post pictures after I do some sewing.

 Peter was happy to sit and pose before our shopping trip. the picture at the top was taken after our trip, notice the different boy. Guess he doesn't like fabric stores yet :) and NO he doesn't need a stroller only his sister was done sitting so he took his turn.
girl's jumper
 Here's a little dress or jumper I made for Gab. The pants I made a while ago and now they're faded compared to the waist band. I included a zipper since some of her jumpers are getting challenging to fit over her head and then I lined the entire bodice including the waist band. The hem was also hand stitched to keep it from turning up, hopefully. Oh and the little blouse was made by Ralph Lauren, most likely the spring line from Macy's. It has a tie in the center which I tucked in for the picture. I really LOVE Ralph Lauren's little girls' clothes especially when it comes to their pretty little tops.

Monday, January 24, 2011
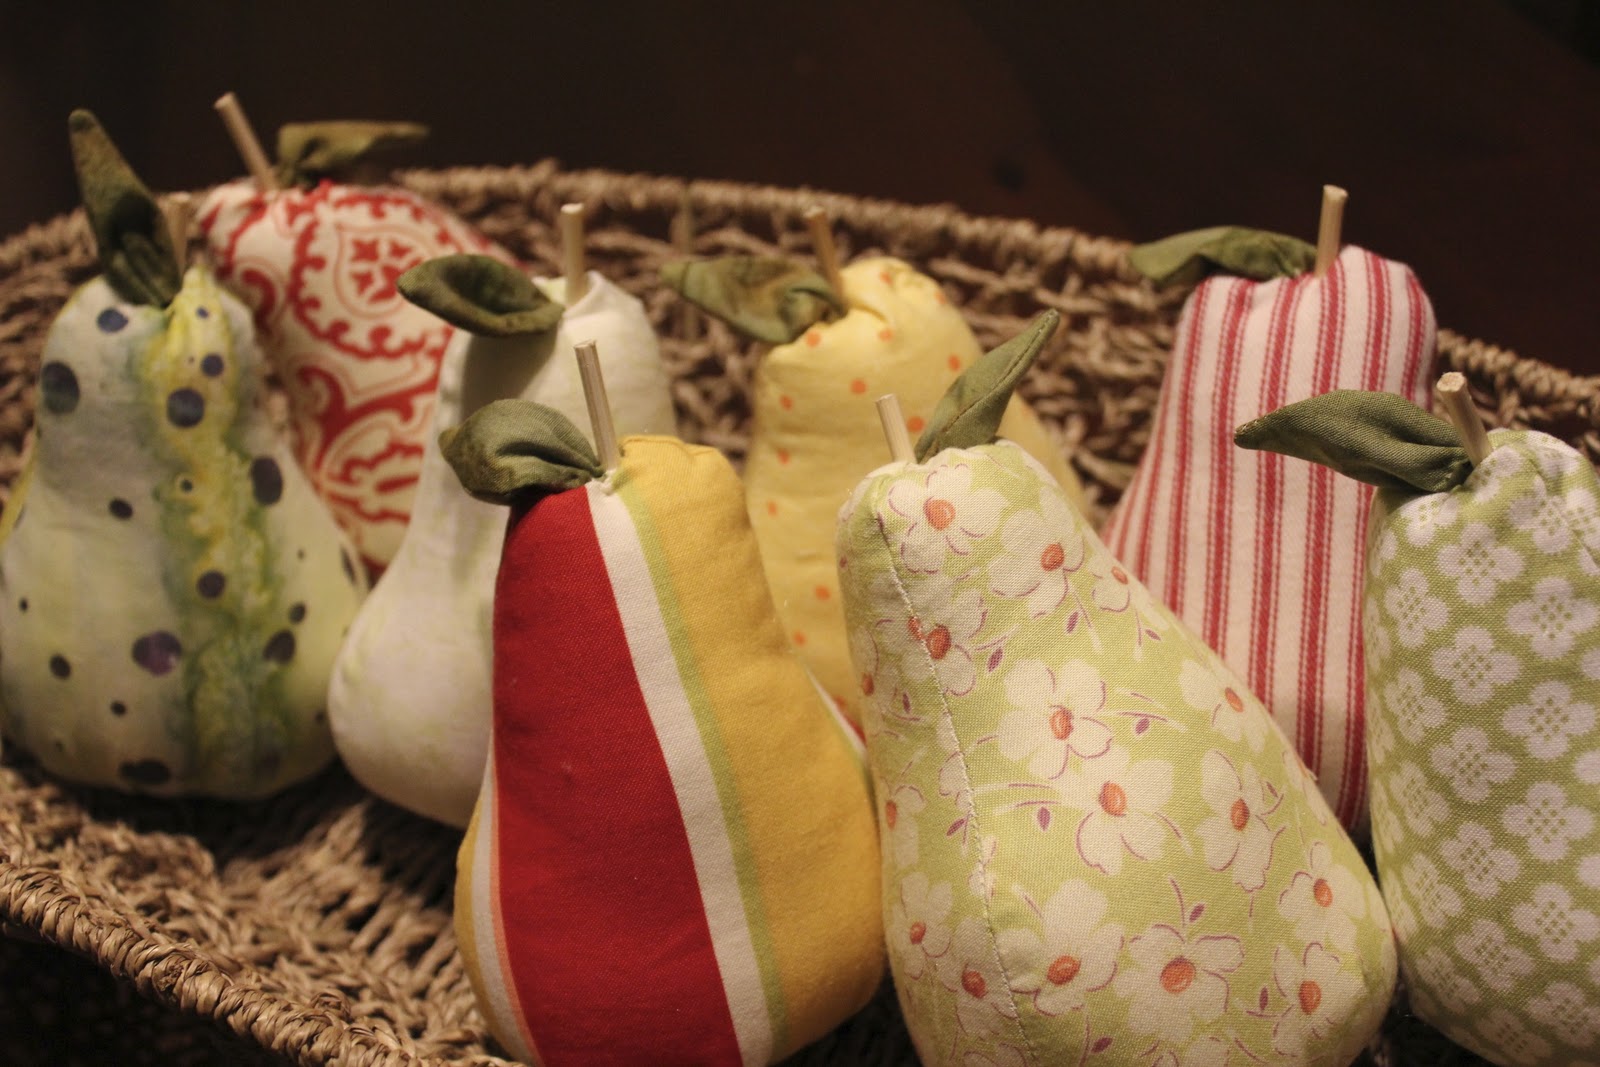
fabric pears

I thought I'd give you a sneak peek at one of the projects I'm working on. The chances of Judy, who's new kitchen is the inspiration for this project, looking at this is slim to none so I thought I'd quick post this.
 I have a book full of super cute shabby chic sewing projects for the home and even as Judy's kitchen pears project has been motivated as an act of love towards my dear friend it looks like if all goes well a few other friends will also have a basket of pears on their dining room table. So this is just the first one. Becky, Judy's daughter, spent an afternoon cutting these out with me, it was definitely a memorable time spent together.
I got my wire basket at Target and picked out shades of green fabric along with other fun accent colors which I'll be sure to post when I finish. Now it's time to run out for kabob skewers for my stems, I used a match stick here minus the tip but I think round would be more realistic than square.
Sunday, January 23, 2011
Little girl's apron
 My little friend Karinna has an apron that's apparently been around for a long time (passed down from her cousins) and each time I see it I find myself drawn to it and even feel compelled to make one like it for Gab. So I used hers to inspire this little apron. Oliver wore it to make pizza with me last Friday night so since it really doesn't fit him or look quite appropriate for a boy I'm sure I'll soon be making 3 boys' aprons most likely with their names on theirs if/when I have time.
To make this I first decided on the size and shape I wanted to make the apron and cut out the back fabric first which is one solid piece. Making it again I'd probably *measure* the width of the apron, add the seam allowance x6, and divide by 3 giving the width for 4 vertical panels. I didn't do this so i ended up randomly piecing each vertical strip on top of the bottom pattern and in the end cut down the bottom a little to make it look okay. To assemble the top I worked with vertical pieces, piecing each one and sewing it together and then deciding on the next row's fabric combination trying to contrast the fabrics as much as I could. Once the top was assembled I ironed the seams open and wanted them to stay flat with out quilting everything in place so I used the thinnest fusible interfacing I had on hand, sewn to the wrong side. This does give the finished apron more structure than if it was not there and obviously the stronger the interfacing the stiffer the apron.
To make the straps I used 2&1/2" strips of fabric cut to the desired length. I used 2 different fabrics for the top straps and picked the back fabric to make the side ties. I folded the strap fabric in 1/2 length wise and ironed then tucked each side in to the center, as if I was making bias tape (not cut on a bias), and then top stitched each one with the ends tucked inside to finish. Each strap was zigzagged in place to reinforce on the top of the apron facing inside so the back could be layered on top and secured by stitching all around the apron w/ a small opening at the bottom. Where it was necessary I clipped the seams and then turned it right side out, ironed & top stitched all around.
I have washed this and it seems to hold it's shape well. As a side note, I love to use contrasting fabrics and in this case decided on these fabrics based on the fuchsia, blue, yellow & pink theme that several of the fabrics repeated.
Subscribe to:
Posts (Atom)